Showing posts with label preserving personal collections. Show all posts

Monday, April 13, 2015

Merging Images in Photoshop, Part Two

While my first post in this series covered some basics of non-destructive image merging in Adobe Photoshop, this post aims to give you some tools to work with less ideal images.

A typical problem faced by many when attempting to merge images is how to deal with slight variations in your materials. These variations can be a result of the hardware you use (scanner or camera), lighting conditions, software, or a myriad other factors.

In this scenario I'll use an image from a scanned book that has a lighting problem. This is a very common difficulty when scanning books on a flatbed; the book's gutter will raise up from the scanner's surface, giving it a darker tone and distorting the content. Applying pressure to the book may work sometimes, but often we do not want to risk damaging our books (or, worst-case-scenario, our equipment) that way. Much safer to work digitally.


The first step is identifying the cutoff point where the gutter begins to negatively affect image quality. As you can see from this image. As always, make sure you've saved a master version before making any edits. 


Use the Rectangle Marquee tool to isolate the "safe zone" of the page, where the page's content is mostly unaffected by the gutter. Copy this selection and paste it into a new document with approximately the same dimensions as the original document. This is our new "base" document. I will usually put the word "EDIT" in its title somewhere so it won't be mistaken for the master.


In situations like this when we are dealing with an off-white paper, we'll want to make sure our background matches the paper's tone. Use the Eyedropper tool to select the page tone, and use the paint bucket to fill it in the background of the new base document.


What we are going to do next is create an amalgam of the image's two elements (page and background) to create a new version with improved legibility. To accomplish this we are going to use Photoshop's Layer Mask tool. Layer Mask is incredibly useful for photo editing, and best of all it is a non-destructive solution, meaning whatever you do with it can always be easily undone. The Layer Mask is very much what it sounds like: a layer placed on top of each image that can be "masked" or "unmasked," concealing or revealing the image's contents. Select the right side layer and click "Add Layer Mask" at the bottom of the Layer menu. You will now see a small white rectangle linked to that layer; that's your layer mask. The color white means "unmasked," so right now it's simply sitting on top of your original layer waiting for you to give it instructions.


Next, be sure you have the correct layer, AND your layer mask selected, or else you will alter the image itself. The Layer Mask functions in grayscale. Black is "masked," white is "unmasked," and grays are everything in between. Set your foreground color to black. Select the brush tool, and reduce the hardness to 0 (use whatever diameter you feel comfortable with). Check again to make sure you're still on your layer mask, and simply begin lightly touching up the problem spots along the gutter with your brush. Use single clicks rather than click-and-drag, that way you will make very minor adjustments while you get a feel for the technique.


As you can see, we've fixed the page to appear legible and flat. But be warned, this exact method won't work for every situation. If you have content that is deep in the book's gutters, you will likely have to accept a less-than-perfect image. However these techniques can still be used to improve the image quality in those situations, it is simply more difficult to get a "perfect" image. Vary your brush settings and color in the Layer Mask (experiment using a 50% grayscale) to find solutions that best suit your situation.

Written by Ryland Ianelli

Friday, May 2, 2014

Preservation Week: Handling Materials

During Preservation Week libraries all over the country present events, activities, and resources that highlight what we can do, individually and together, to preserve our personal and shared collections.

Preservation Tip:
General Handling:
One of the simplest tips to help preserve paper and other materials is to wash your hands before handling them, and to take special care when you do open or move them around. Avoid using excess stress to open books, and don’t “crack the spine.” When you move books, don’t slide them on a table, pick them up instead. Delicate pieces of paper can be placed in folders or on top of sturdier paper to support them when lifted. Keep food and drink away from these items.

For more information check out the Northeast Document Conservation Center at http://www.nedcc.org/free-resources/preserving-private-and-family-collections/caring-for-private-and-family-collections

Why is preservation important?
In 2005 the first comprehensive national survey of the condition and preservation needs of the nation’s collections reported that U.S. institutions hold more than 4.8 billion items. Libraries alone hold 3 billion items (63 percent of the whole). A treasure trove of uncounted additional items is held by individuals, families, and communities.
Some 630 million items in collecting institutions require immediate attention and care. Eighty percent of these institutions have no paid staff assigned responsibility for collections care; 22 percent have no collections care personnel at all. Some 2.6 billion items are not protected by an emergency plan. As natural disasters of recent years have taught us, these resources are in jeopardy should a disaster strike. Personal, family, and community collections are equally at risk.
Key environmental factors that place collections at risk:
  • Light: Ultraviolet rays from natural and artificial sources can cause fading and disintegration.
  • Pollutants: Dust is abrasive and can accelerate harmful chemical reactions.
  • Heat: High temperatures can accelerate deterioration.
  • Moisture: High humidity promotes mold growth, corrosion, and degradation, while excessive dryness can cause drying and cracking. Fluctuations between extremes can cause warping, buckling and flaking.
Key items that should be preserved include historical materials that are unpublished and one-of-a-kind, such as:
·         architectural drawings
   ·         artifacts
·         audio and video recordings
·         diaries
·         genealogical information
·         letters
·         maps
·         memoirs/reminiscences
·         minutes/reports
·         photo albums and photographs
·         printed materials
·         professional and business papers
·         speeches/lectures


Wednesday, April 30, 2014

Preservation Week: Digital Storage

During Preservation Week libraries all over the country present events, activities, and resources that highlight what we can do, individually and together, to preserve our personal and shared collections.

Preservation Tip:
Digital:
Keep those digital treasures safe! Schedule automatic backups through your operating system. Back them up using an external hard drive or Internet storage! Avoid-long term storage on CDs, DVDs, and flash drives.

For more information check out the Library of Congress at http://www.digitalpreservation.gov/personalarchiving/

Tuesday, April 29, 2014

Preservation Week: Archival Storage for Photographs

During Preservation Week libraries all over the country present events, activities, and resources that highlight what we can do, individually and together, to preserve our personal and shared collections.

Preservation Tip:
Photos:
In today’s world of digital and traditional photography, thorough knowledge of the preservation options for the format you use is helpful. For paper-based materials write relevant caption and date information in pencil on the back of the print photograph. For digital photographs, add this information (metadata) in the space provided for it in your software program, and consider naming images with meaningful and specific file names. Choose archival storage means for both, whether acid-free albums or boxes for one or a digital back-up system for the other.

For more information check out the Library of Congress at http://www.loc.gov/preservation/care/photo.html

Preservation Week Events:
Free webinar will be offered during this week: Registration is required. To register and learn more go to ALCTS Events <http://www.ala.org/alcts/confevents>. The webinar will begin at 1 p.m. CDT and will last about one hour.

Tuesday, April 29th - Low-Cost Ways to Preserve Family Archives

Presented by Karen E. K. Brown, preservation librarian for the University at Albany, SUNY University Libraries. What can we do to protect our collectables from damage even if we don’t think we have a perfect place to keep them? Learn about possible risks from handling and the environment, and practical, inexpensive ideas to keep collections safe to help ensure what you have can be shared for many years to come. ALCTS thanks Archival Products <http://www.archival.com/> for sponsoring this webinar and supporting Preservation Week.


Monday, April 28, 2014

Preservation Week: Storing Papers + Open House Today

During Preservation Week libraries all over the country present events, activities, and resources that highlight what we can do, individually and together, to preserve our personal and shared collections.

Preservation Tip:
Paper:
Store your paper materials in an environment with relatively low humidity, away from direct sunlight, and on shelves not on the floor.  Whether you have books, maps, letters or other items made primarily of paper, a good environment will contribute a lot to their future condition.

For more information check out the National Archives website http://www.archives.gov/preservation/

OPEN HOUSE TODAY - 11:00-1:00PM
Digitization for Access and Preservation
Baker Room 02

Dartmouth College Library Digital Program: Digitization for Access and Preservation 

Visit the Digital Production Unit at Baker Library to learn how the Library’s Digital Program provides access and preservation to the Library’s collections.  An open house showcasing conservation, digitization, and digital preservation will be held on Monday, April 28, from 11 am until 1 pm in Baker Library, Room 2 (east end of the Orozco Corridor).  

Tuesday, October 8, 2013

Manage Your Photos with Adobe's Bridge and Lightroom

If you decide to digitize a collection of images, such as a photo album or a slideshow, there are literally thousands of different software solutions to go about organizing them. Many of these can come bundled with scanning or photo software, and often those can offer a relatively low-cost and hassle-free solution to keeping track of your images.

However, if you want to ensure the maximum compatibility and usability of your images over the long term, there are more advanced options available through Adobe's very popular line of professional software. The complete Creative Suite (and the newly-offered Creative Cloud) feature an almost overwhelming amount of tools, from film editing to website design, along with the nigh-essential Photoshop.

Two of these programs are designed for the main purpose of organizing and viewing large collections of images; something you might imagine is essential to the kinds of digitization projects taken on by the Dartmouth College Library's Digital Production Unit. Adobe Bridge and Adobe Lightroom each offer distinct advantages over the other, and while they may share some purposes, it can save you a lot of time to know which one suits your project best.

Adobe Bridge is, as its name implies, an excellent way to organize many different kinds of media, "bridging" many formats. It is designed to play nicely with all other Adobe programs, and offers an excellent alternative to the standard Mac OS Finder, or Windows Explorer when it comes to browsing collections. The interface can be altered modularly to suit a project, meaning you can re-size, add or delete tools from the main screen with great ease. Additionally, you can add or alter image metadata, and do batch file renaming. Its flexibility is its best selling point, making it a helpful addition to any Adobe-based workflow.

Lightroom, on the other hand, is designed specifically for photographs. In addition to letting users browse through collections of photographs, Lightoom offers far more tools for photo-editing than Bridge, and presents them in a way that is familiar for professional or amateur photographers. While at first blush this would appear similar to running a combination of Bridge and Photoshop, it actually has a few interesting tricks of its own.

The most important thing about Lightroom is to think of it within the context of a photographer's studio. The program is designed to take raw camera files (.dng is the most common format) and apply various changes to it without altering the originals. The entire editing action takes place within the Lightroom environment, so you are never in danger of losing data. You can think of your raw camera files as digital negatives, to be used and reused to create different print files. Lightroom easily stores setting data, allowing you to export as many kinds of derivative files as are needed. However, it is designed around these features. If you want to make actual changes to a master document you'll have to use Photoshop.

Between these two programs we can respond to all kinds of challenges in the Digital Production Unit, organizing and reworking files in the manner best suited to the project.

Written by Ryland Ianelli 

Tuesday, April 16, 2013

Dust in the Machine

In the last year since the Digital Production Unit was added to Preservation Services we've grown and adapted to many challenges. One of our most resource-heavy projects is the Dartmouth Photo Files, a project to scan and collect the college's photographic records currently being held in Rauner Special Collections Library. So far we've scanned and uploaded nearly 8,500 photographs; merely one-tenth of the estimated total. We realized quite early that a project of this scope and type has different requirements than the smaller projects we regularly take on. This post will address the recurring issue of dust in the scanner.

While flatbed scanners like our Epson Expression 10000XL merely require the occasional spritz of glass-cleaner to maintain, our feed scanner, the Kodak PS810, is far more demanding due to its complicated internal mechanism and heavy amount of use. A piece of dust on a flatbed scanner is quite difficult to notice, and usually does not produce an unusable result (at the very worst it will catch the reflection of the scanner's lamps and discolor a few pixels). However a piece of dust inside the feed scanner will leave a quite noticeable mark on the image in the form of a colored (usually green) streak across the image. This happens when a piece of dust is trapped on the scanner lamps and the image is dragged over it, producing a line, like this:


Dealing with this dust starts at the beginning of every scanning session. Every day we use it the Kodak PS810 (as well as its surrounding area) is thoroughly cleaned. The feed rollers are wiped free of dust and the lamps are cleaned off with special polishing wipes. At the end of this process a "transport cleaning sheet" is fed through the scanner; this sheet has a sticky surface and is designed to pick up the last stray bits of dust. Afterwards the machine is ready to scan.

However, dust does not simply stay out of places that have been cleaned once, and in the Photo Files project we found that many of the photos themselves are responsible for dragging dust into the scanner's inner workings. In most cases where this occurs the dust stays on the lamp for several photos until it is dragged off, producing a sequence of photos all with the same green line across them. Needless to say, this is problematic for our finished product.

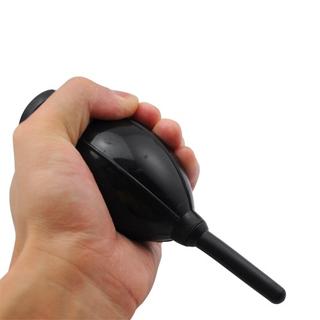
After attempting a few solutions to this problem, the best one we came up with was a spot-dusting of every photo before it goes through the scanner using a squeeze-duster like this:


While the procedure isn't perfect, it does lower instances of this problem drastically. Remaining dusty images are caught during our quality-assurance step and rescanned. Some photo scanning software claims to be able to remove this effect through digital manipulation (including Kodak's own software, which we do not use), however we chose not to adopt this in our procedures in order to maintain the integrity of the original, unaltered image. The result of such process is as claimed, removing the green dust lines, however it accomplishes by distorting the parts of the image directly above and below the dust, creating a blurred effect that is noticeable upon close inspection. While this is probably a good solution for a hobbyist, we intend to ensure the best possible condition for our scans in the long run. In this case the old saying holds true: a pinch of prevention saves a pound of cure, and by ensuring best practices at the scanning phase we can drastically reduce the need for rescans.

Written by Ryland Ianelli.

Tuesday, February 19, 2013

Keeping Personal Digital Photographs: Part 1

My father celebrated his 90th birthday last year and at his party about a dozen old black and white photos were enlarged and on display. Thinking about these few remaining photos from his childhood and early adult life I wondered how many of the thousands of digital photos I had taken would survive and be as easily usable when my child decorates for my 90th birthday party. As a preservation professional it gave me a queasy feeling that I had more confidence in the survival of these black and whites than I did of my large, unorganized digital collection.

Dad and Great-Grandpa

Haunted by the state of my photos I set a New Year’s resolution to organize my digital photographs in the first step to make certain they will be preserved into the future. To do that I’ll follow the guidelines published by the Library of Congress, National Digital Information Infrastructure and Preservation Program, Keeping Personal Digital Photographs, and to keep me motivated I will write about the experience. Knowing I have an audience (hi Mom!) should keep me on track.

The first archiving tip:
Identify where you have digital photos
  • Identify all your digital photos on cameras, computers, and removable media such as memory cards.
  • Include your photos on the web. 
Easy! I regularly download photos from the camera’s memory card (SD card) onto my home computer that is backed up with an external hard drive. Only when I’ve downloaded all the photos do I erase them from the card.

But wait! What about the photos on my iPad? And the cell phone? Photos on my iPad are occasionally synced to my work laptop but not to the home computer. Photos taken with my phone live only on my phone. Luckily the only photos I’ve posted to the web are stored on my computer – for now. So how am I going to keep track of these photos? At the risk of giving up before I’ve started I’ve decided to create a policy:

Barb’s Family Photo Archive Policy:
  • The home computer will be the primary archive for all photos.
  • Photos taken with mobile devices AND considered worth keeping long term will be downloaded to the home computer.
  • Consider mobile devices as disposable photo albums.
In the coming weeks I will continue to follow the guidelines to get my personal collection under control and will describe my successes and obstacles to success.

Written by Barb Sagraves.

Friday, April 27, 2012

Preservation Week Pointer #5 - Mold

Preservation Week: April 22- 29, 2012. This week on the blog we're highlighting Preservation Week with daily pointers for preserving your personal collections.

With the devastation of last year’s flood still lingering and the cleanup ongoing, it is vital that we keep in mind one of the most damaging aspects of flooding: mold contamination.

Mold can feed on paper and glues that are in your valuable books. In the right conditions mold can develop within 48-72 hours once an item becomes wet. With the promise of warmer weather coming soon, it is important to be diligent in keeping your surroundings clean and free of moisture. To learn about preventing mold growth here are a few web sites:
Preservation Week at Dartmouth College Library is part of an annual event sponsored by the American Library Association to raise awareness of preservation issues and solutions. For more information visit our website.

Thursday, April 26, 2012

Preservation Week Pointer #4 - Save Your Digital Photographs!

Preservation Week: April 22- 29, 2012. This week on the blog we're highlighting Preservation Week with daily pointers for preserving your personal collections.

When you upload digital photographs to online services for sharing (such as Facebook, Flickr, Google+, etc.) those services automatically compress your images. What does that mean? Well, they’ll still look fine when viewed on the web, but if you ever want to download them in their original high quality for printing, you’re out of luck! So while these sites are great for sharing, it’s best to save a high-resolution copy of your original image on your own computer (and back it up, of course).

Some services such as Flickr will store high-resolution images if you pay for a pro account, but most don’t do this for free accounts…be sure to do your research if you want high-quality images to use in the future. For more information about preserving digital photographs visit the Library of Congress Keeping Personal Digital Photographs web page.

Preservation Week at Dartmouth College Library is part of an annual event sponsored by the American Library Association to raise awareness of preservation issues and solutions. For more information visit our website.

Wednesday, April 25, 2012

Preservation Week Pointer #3 - Digitizing Videotape

Preservation Week: April 22- 29, 2012. This week on the blog we're highlighting Preservation Week with daily pointers for preserving your personal collections.

Videotape recorders and birthdays. Videotape recorders and graduation. Videotape recorders and weddings. Got the picture? Videotape recorders once captured many of these special moments. As time passes these video tapes and video tape players are a dying technology.

To ensure that your recordings remain watchable it is best to digitize or reformat the tape. This won’t preserve the original tape medium, but will convert the video content to a digital copy that can be accessed and migrated over time.

Preservation Week at Dartmouth College Library is part of an annual event sponsored by the American Library Association to raise awareness of preservation issues and solutions. For more information visit our website.

Tuesday, April 24, 2012

Preservation Week Pointer #2 - Spring Cleaning

Preservation Week: April 22- 29, 2012. This week on the blog we're highlighting Preservation Week with daily pointers for preserving your personal collections.

Keeping the books on your shelves clean will increase their longevity. Dusting and vacuuming are two methods appropriate for keeping books free of dust. Preservation specialists advise particular techniques for cleaning and handling books. Consult these instructions from the North East Document Conservation Center prior to taking on this task.

Preservation Week at Dartmouth College Library is part of an annual event sponsored by the American Library Association to raise awareness of preservation issues and solutions. For more information visit our website.

Monday, April 23, 2012

Preservation Week Pointer #1 - Family Treasures

Preservation Week: April 22- 29, 2012. This week on the blog we're highlighting Preservation Week with daily pointers for preserving your personal collections.

When you sit down and think about how many different types of materials you have that represent family history and treasured memories, it can be quite overwhelming. Newspaper clippings, letters, scrapbooks and ephemera, photos, film, video, computer files and DVDs are some common examples. Methods of handling and storing each item will directly influence longevity and use by future generations. Preservation Week is an opportunity to take action and address some of the needs of your valuable personal belongings.

To help you determine what you can do, check out these online information resources:
Preservation Week at Dartmouth College Library is part of an annual event sponsored by the American Library Association to raise awareness of preservation issues and solutions. For more information visit our website.