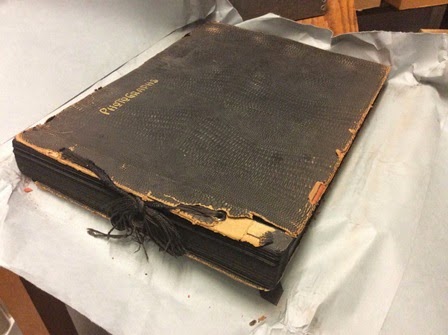
Showing posts with label book repair. Show all posts

Tuesday, May 31, 2016

Double-Fan Adhesive Binding

The Double-Fan Adhesive Binding is a treatment we use in Preservation Services for new single sheet items with a good gutter margin such as theses or to repair worn out adhesive bound books.  Good margins are important as the process will trim 1/16" all around when finished.

MATERIALS

2 endsheets: cut to Height (H)
2 20-point boards: cut to Width (W) x Height of book
        (Can stack endsheets and boards to cut on guillotine)
Cloth lining: cut to H x [spine thickness + 2"]
Covering cloth: cut to H x [(W x 2) + spine thickness]
Double-sided tape
PVA glue
Tyvek optional 

PREPARE

Trim out of old case, leaving case intact, if possible.
Mark upper foredge of text with pencil mark (gets trimmed off later). 


Put rough-cut boards and endsheets into position with endsheet folds at foreedge to remain intact when cut.
Cut spine off.


DOUBLE FAN GLUE

Clamp into press screwing in the pressure equally.  Three loose bars are in the press (one has an L-shaped piece attached) with usual sized books.  Can remove one or more for bigger (wide and tall) book.


 Tip up the book to work on it.  Glue the spine once as it is straight up.  Fan it left and glue.  The fan it right and glue.  Squeeze the glued spine into shape.


CLOTH LINING

Glue up lining and set on evenly, pinching and pulling and smoothing.  Set onto spine and let dry about one hour.


BOARDS

With a pair of dividers run a score line 1/4" from the spine edge head to tail on each board.  Run a strip of 1/2" double-stick tape down the inside edge of the score line.  Flip the board over and glue the board up.  Now place glued side of board down onto text block lining up the spine with the double stick tape edge along the spine edge.  Nip for 30 seconds in press.                                                                                                                      


COVER WITH CLOTH or ORIGINAL PAPERBACK COVER

With new cloth:

Cut cloth to H x [(W x 2) + spine thickness].
Crease at the first spine fold.  Then make another fold 1/4" from this line (toward the foredge).  Make the other spine fold, and then the 1/4" fold from that line (toward the foredge).


Test fit the cover if cloth.  Clip off excess before gluing.  Put tattle tape onto spine cloth.  Glue up the boards, peel off the double-stick tape backing.  Press board going from spine to foredge.  Nip 30 seconds in press.  Let dry one hour under weight.


Prepare old case materials to reattach:

Trim out spine, old plate from old cover and reattach.  If the spine is porous, line the back with Japanese tissue.  If barcode is on board make sure to save and reattach.  If old cover is not usable in one piece, trim front and back covers to size and glue onto new cloth.

Once textblock is dry, trim no more than 1/16" from the head, tail and foredge on the guillotine.  Do a visual double check of margins to make sure where cutting is safe.


RECASE

Paperback cover:

Take a piece of Tyvek cut to H x [spine thickness + 2"] and glue over spine area of cover covering the 1/4" folds by 1/2" or so.

Clean the joint area.  Put tattle tape onto the spine of case.  Recase the book.  Trim if needed.

VARIATIONS

Kerfs (do before put on cloth liner)
On a very thick book, could put on a second liner and then make kerfs (saw marks) cut into the spine at an angle.  Could glue in some thick sewing thread, leaving them longer and then glue them down to the sides.


Written by Brian Markee.


Tuesday, March 31, 2015

Structural Intervention: Treatment of Albums from the Iconography Collection

As a Samuel H. Kress Conservation Fellow, I have been spending my first post-graduate year revamping Rauner’s Iconography Collection. The Iconography Collection is an image-based collection which includes prints, photographs, negatives, albums, and various other materials.  In my initial survey of the collection I found that a number of the top treatment priorities were albums.  I decided to focus on treatment of these albums not only because they were in poor condition, but also because this allowed me to further explore my interest in album structures. 

Example of a damaged album discovered during the survey.

   
In conservation we try to preserve the original structure of the books we work with, but there are times when the original structure is inherently problematic and must be altered to prevent future damage. I have found that this is especially applicable to albums.  A common condition issue was that either one or both of the boards were detached. 


For the album shown below, I successfully reattached the boards and preserved the original structure of the album.  The detachment occurred between two of the front pages, and the spine covering had pulled away from the text block.  I cleaned the old adhesive from the inside of the spine covering and the spine of the text block, and then placed new linings on both.

Carte-de-visit album before treatment, showing detached front board.

 Here you can see that the new spine lining was used to successfully reattach the front board.
  
Carte-de-visit album after treatment, showing reattached front board.

  
However, for some of the other albums treated, such as the next example shown below, I decided that returning the album to its original structure was not the best solution.      
  
Carte-de-visit album before treatment, showing detached front pages 
and detached cover.

While I placed a new lining on the text block spine and attached the text block to the back cover, I chose to leave the front board detached. Reattachment would have made the album too difficult to open and would have caused it to break again in the same exact manner. 
  
Carte-de-visit album after treatment, showing reattached front pages and front cover 
left purposefully detached  (back cover has been attached to the text block).

My favorite album from the collection features stunning watercolors from 1857-58 made by Sir Henry Hugh Clifford, who was stationed in Canton, China an Assistant Quartermaster General in the British Army.  While Clifford was stationed in China to serve in the Second Opium War, his meticulous paintings capture serene and colorful landscapes and portray scenes of everyday life in China.

Watercolor painting by Sir Henry Hugh Clifford entitled "Chinese Junk"

As we are nearing the end of a long, cold winter, this album has been a treat to work with, and has led me to start fantasizing about warmer weather and beaches.

Watercolor painting by Sir Henry Hugh Clifford entitled "Sunset, Victoria".


Prior to treatment, the album was bound in a post-style binding.  After close examination, it became clear this was not the original binding structure and the cover did not add informational value to the object. 

Overall image of album: please note the significant amount of
surface dirt on the pages in the upper right.


Detail of post binding structure: cord strung through two holes through
text block and tied together, pages are not secure.

We decided that removing the album from the binding completely and storing the leaves in an enclosure was the best solution, because this will allow for easier access and prevent strain on the pages.  While dis-binding the album, I conducted dry surface cleaning of the pages to remove the highly noticeable, easily-transferable dirt.


Dry surface cleaning a page from Sir Henry Hugh Clifford's album using
cosmetic sponges.

Album page after surface cleaning.
Album page before surface cleaning.


Collectively, these treatments show that, while we strive toward minimal intervention, altering the structure of bound materials is sometimes the best course of action to prevent further damage. 


Written by Tessa Gadomski


Tuesday, August 19, 2014

Attachments: Book Arts Style

My last post discussed attachments with a conservation focus. Sometimes the creative possibilities are more important than the archival ones, or piercing holes in items is part of the artwork itself. In that case, here are some further ideas to attach loose items onto a page or in a book.

Just keep in mind that some of the methods below may create permanent changes in the mounted item and are not recommended for valuable, historic, or borrowed materials. Consider the long-term effects of any of these before using in your own projects.

As we saw in the last post (July 22) these were some options for attaching loose items to pages:

Paper clips:

Historically paper clips were made of metal, but those can be prone to rust over time in certain environmental conditions. Alternative shapes to the classic double loop include this dog and the circle. Those made from plastic or coated wire are also commonly available. The binder’s clip is useful for thicker materials. Both paper and binder’s clips come in a variety of sizes.


Eyelets:
 

This creates a hole in both the page and the item attached. It requires an eyelet setter such as this one often available where craft or sewing notions are sold.

Brads: 


Brads usually come in a brass colored metal, but are also available in mini sizes and in a variety of colors. Some even have a shaped head, such as a star or square, like this one.  Brads, like eyelets
and staples, create holes in both item and page.

Staples: These can be hard to remove without causing damage.

Adhesive: Paste and Glue

Adhesives are generally a permanent method of attachment, whether glues, double-sided tapes, or dry-mount adhesives.  Pastes (as opposed to glue) are generally reversible, however they often leave evidence of their application and use.

Pockets & Envelopes:

Loose pockets or envelopes can be attached by a variety of methods, like any loose item. They can also be incorporated into an album during its creation by sewing them in as part of a section or in binding of single sheets. Extensions (or guards) can be attached to the binding edge to allow for ease of use, like in this example where the purple extension is sewn in on the binding edge of the brown envelope. This album is bound with screw posts.

Slits and slots:


Photo corners:


Snaps:

 
These plastic snaps are a scrap-booking item, and operate much like a traditional sewn snap, but are attached more like a brad. A tiny hole is made in both item and page. The two parts of the snap are inserted through from front and back and “snap” together holding them in place.

Screw posts:


Screw posts are much like eyelets, as holes must be made in both item and page. They can hold thin to very thick items, and come in a variety of metals. These are usually used for binding, with extensions available to adapt the original to hold a collection of expanding material. But they can be used for putting a single item onto a page. These are often available at hardware and stationary stores.

Adhesive: Tape

All kinds of tape can work: traditional adhesive tapes such as medical paper adhesive tape, electrical, masking, double-sided, or cellophane. Newer products like colorful washi tape can also be used highlighting the attachment or construction while at the same time adding decoration. Just keep in mind that all tapes have adhesive that is extremely difficult if not impossible to remove.

Needle and Thread:


By machine or hand sewing a needle and thread can attach paper together not just cloth. Paper is not as forgiving of mistakes when sewing, but it works well for many things. I’d recommend testing the paper, needle size and type, and thread combination with the intended materials before embarking on a big project.

Buttons:


Attached with thread, buttons can also be used with a paper page to attach items. To help avoid tearing through the paper, sew a small piece of Tyvek behind the button to reinforce the attachment. Old shipping envelopes can be cut up for this purpose. The button can be used to help secure the thread attachment, sewing through the item and page, or it can be used with a buttonhole if the item can be cut into and has enough flexibility and strength to do so. Often flat buttons are most useful, especially if they will go into some kind of book or album. Stores that sell scrapbook supplies often have such flat, decorative buttons, and these are available at sewing stores as well.

Paper Frames:


Like pockets and envelopes, paper frames can be attached to a page as a means to hold a photo or bound in as pages when binding a new album. These frames can be folded to fit a photo and hold it in place without using adhesive.


This photo shows the reverse side of the frame above.


As I mentioned in my last post, with all these attachment methods remember to keep the spine and foredge of your book balanced with regard to the thickness of your added items. Doing so will help you avoid the foredge splaying out and the book not closing. When creating a new binding, stubs can be added at the spine to accommodate the addition of items over time.

I hope these suggestions prove helpful. I often collect small pieces of paper or ephemera, especially as reference for future projects. Sometimes I just toss these into a box, but perhaps I ought to create a “book of inspiration” using some of these attachment methods. Like commonplace books of the past, my book would be both personal and useful. What kinds of uses do you see for these attachments? What other attachment methods do you find helpful?

Written by Stephanie Wolff

Tuesday, July 22, 2014

Attachments: Conservation

This spring a scrapbook compiled by the Dartmouth Educational Association came in for some minimal repairs. This archival volume is a bound book with numbered pages. It holds a collection of loose items that have been added to the book over time. Scrapbook compilers have not always given consideration to the long-term effects of their methods, often choosing materials they have on hand. That’s likely the case with this volume, because only one of the methods (paper clip) doesn’t alter the item. Its contents, though, are in pretty good shape. Despite its overfilled pages, the book needed little more than a spine repair. I thought I would highlight some of the attachment methods used in this volume, concerns about their use, as well as share some tips for attaching loose items to pages with an eye toward longer-term preservation of those items.

Paper Clips and Brads:


On this page, both a paper clip (the triangular silver metal piece) and a brad (the brass-colored item) have been used. Both are made of metal, which can be prone to rust over time in certain environmental conditions. (Though no rust was found here.) The brad also requires a hole in both the item and the page in which to place the flanges. Modern paper clips are available in plastic or coated metal that should not rust. Be careful of causing creases in the paper if using paper clips, and choose the proper size to accommodate the thickness of the papers.

Eyelets:


Interestingly, eyelets were used in this album. I imagine they were attached using an eyelet setter like this classic Bates Eyeleter. This method requires a hole in both the page and the item attached, similar to the brad attachment. Even without moisture to create rust, it’s possible for metal to discolor or damage the paper on a facing page as a result of friction or pressure.

Staples:


Some of the items were stapled onto the pages. Staples create holes in the item as well as the pages and can be hard to remove without causing damage to both. They are also made of metal and therefore can rust in a humid environment.

Adhesive: Paste or Glue


It’s hard to tell whether this card was attached with paste or glue. Adhesives are a pretty permanent method of attachment. Some pastes (as opposed to glues) are often reversible, however they can leave evidence of their use.

The items that were attached to these pages used some kind of permanent alteration to the item itself (application of adhesive or holes in the paper) except for the paper clip. When considering which attachment method to use in a similar type of album these days, here are a few other options that do not require applying glue to or piercing holes into the item, though they require glue or holes in the album page itself.

Slits and slots:  


To mount a photograph or other flat item onto a book page, make cuts in the base paper (a slit) or remove a narrow slice of paper (a slot) for thicker material. By locating these cuts diagonally at the four corners, the item can be slipped in and will stay without any adhesive.

Photo corners:


Photo corners come in a variety of styles: self-adhesive, gummed, clear, black or white paper, and they can easily be made by hand. Look for ones that pass the P.A.T. test (photo activity test) or have archival qualities, such as being made from acid-free materials. To make your own corners take a thin strip of acid-free paper (about 1/4-inch), at the center of the strip fold one side up at a 45-degree angle.


Then fold the other side up to meet and match the first side. Now you have a corner. Vary the thickness of the paper strip to change the size of the corner for larger or smaller photos. Once the corner is created, use acid-free tape or adhesive to attach to the mounting page or board. These can be used for other flat items as well as photographs.

A simple way of positioning the corners is to use the photo (or a facsimile of the photo of identical size and thickness) as a placeholder. Determine the location of the photo on the page and place a clean weight on top of it to hold in place. Next slip the four corners onto the photo. Then remove one corner, add or activate the adhesive and place back onto the photo and press down to attach to the page. Then do the same to the corner diagonally opposite the first corner. This will stabilize the photo. Continue with the remaining two corners and remove the weight when done.

Pockets & Envelopes:

Pockets or envelopes (choose ones made of acid-free materials) are a great way to add loose items to a page. They can be handmade or purchased and can be paper or clear Mylar. Mylar allows a view of the item without removing it. Use an acid-free adhesive (like glue or double-sided tape) to attach pockets and envelopes to the page.

With all these methods remember to accommodate the thickness of the items added to a bound volume by balancing the binding edge thickness with the foredge thickness to avoid the foredge splaying out and the book not closing. For just a few items this shouldn’t be a problem.

In my next post, on August 19th,  I’ll explore attachment methods more suited to a creative or book arts application.

Written by Stephanie Wolff