Showing posts with label archival. Show all posts

Tuesday, March 31, 2015

Structural Intervention: Treatment of Albums from the Iconography Collection

As a Samuel H. Kress Conservation Fellow, I have been spending my first post-graduate year revamping Rauner’s Iconography Collection. The Iconography Collection is an image-based collection which includes prints, photographs, negatives, albums, and various other materials.  In my initial survey of the collection I found that a number of the top treatment priorities were albums.  I decided to focus on treatment of these albums not only because they were in poor condition, but also because this allowed me to further explore my interest in album structures. 
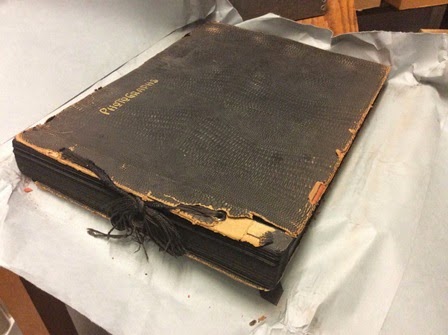
Example of a damaged album discovered during the survey.

   
In conservation we try to preserve the original structure of the books we work with, but there are times when the original structure is inherently problematic and must be altered to prevent future damage. I have found that this is especially applicable to albums.  A common condition issue was that either one or both of the boards were detached. 


For the album shown below, I successfully reattached the boards and preserved the original structure of the album.  The detachment occurred between two of the front pages, and the spine covering had pulled away from the text block.  I cleaned the old adhesive from the inside of the spine covering and the spine of the text block, and then placed new linings on both.

Carte-de-visit album before treatment, showing detached front board.

 Here you can see that the new spine lining was used to successfully reattach the front board.
  
Carte-de-visit album after treatment, showing reattached front board.

  
However, for some of the other albums treated, such as the next example shown below, I decided that returning the album to its original structure was not the best solution.      
  
Carte-de-visit album before treatment, showing detached front pages 
and detached cover.

While I placed a new lining on the text block spine and attached the text block to the back cover, I chose to leave the front board detached. Reattachment would have made the album too difficult to open and would have caused it to break again in the same exact manner. 
  
Carte-de-visit album after treatment, showing reattached front pages and front cover 
left purposefully detached  (back cover has been attached to the text block).

My favorite album from the collection features stunning watercolors from 1857-58 made by Sir Henry Hugh Clifford, who was stationed in Canton, China an Assistant Quartermaster General in the British Army.  While Clifford was stationed in China to serve in the Second Opium War, his meticulous paintings capture serene and colorful landscapes and portray scenes of everyday life in China.

Watercolor painting by Sir Henry Hugh Clifford entitled "Chinese Junk"

As we are nearing the end of a long, cold winter, this album has been a treat to work with, and has led me to start fantasizing about warmer weather and beaches.

Watercolor painting by Sir Henry Hugh Clifford entitled "Sunset, Victoria".


Prior to treatment, the album was bound in a post-style binding.  After close examination, it became clear this was not the original binding structure and the cover did not add informational value to the object. 

Overall image of album: please note the significant amount of
surface dirt on the pages in the upper right.


Detail of post binding structure: cord strung through two holes through
text block and tied together, pages are not secure.

We decided that removing the album from the binding completely and storing the leaves in an enclosure was the best solution, because this will allow for easier access and prevent strain on the pages.  While dis-binding the album, I conducted dry surface cleaning of the pages to remove the highly noticeable, easily-transferable dirt.


Dry surface cleaning a page from Sir Henry Hugh Clifford's album using
cosmetic sponges.

Album page after surface cleaning.
Album page before surface cleaning.


Collectively, these treatments show that, while we strive toward minimal intervention, altering the structure of bound materials is sometimes the best course of action to prevent further damage. 


Written by Tessa Gadomski


Tuesday, March 3, 2015

Good Deeds from Conservation

Summer can be a good time to reach out and do those special projects that have been on the back burner. One of those projects for us was the Art Oversized collection housed in a small room that struggles with environmental conditions. When there I would upload temperature and humidity information from the data logger and I noticed how the books were shelved.  During these summer terms we often have students working every day with longer shifts. Last summer we were fortunate to have a student working with us who was interested in conservation and wants to have a career in the field. So I thought this would be good practical experience in basic conservation outreach, getting a lot of bang out of a little muscle and sweat.


Oversized material poses a challenge when it comes to shelving. We are fortunate to have shelves that are designed for these types of large items. But how should they be organized and kept safe?

  
Large heavy books were located on top shelves which made them difficult and potentially dangerous to retrieve, and large thin portfolios were unable to lie flat.
  

Over time disfiguration can occur when a book is slouched or forced into an awkward position.


So to begin the process I approached the curator and proposed that over a course of a few days the student and I could come in and clean and tidy up in order to return the books to a more fitting posture and refresh the very small space.  The offer was well received as the staff there has no time to address such a project.


We brought in a small vacuum, a book truck, face masks, gloves, ear plugs, lab coats, a spray bottle and lots of paper towels. The books and shelves were quite dusty so we needed to do a good amount of cleaning. Working as a team was the best way to go. I had done this type of project when I was a student, along with a co-worker, and we ended up making a lot progress and having quite a good time. 
  

We started at the top of one end of the shelving and worked our way down and over. One person would do an initial vacuum over the books and shelf and then would hand the books to the other person who would put them on the book truck. The books would then be vacuumed more thoroughly moving the nozzle across the surface and around the edges in a forward motion. Our colleagues at the University of Washington created this nice video on cleaning if you are interested in more details on cleaning books: http://www.lib.washington.edu/preservation/preservation_services/clean


The other person would mist a bit of water over the bare shelf to minimize the dust from spreading, and wipe it dry removing the dirt and dust. Books were then returned to the shelf. We did have flexibility to slightly alter the location of the books, so when very large heavy books were on a top shelf we could relocate them to a lower shelf. We were also able to reunite sets of books that had gotten separated.


We were careful to take breaks and not spend too many hours in a single visit.


So over a course of a few days, working for just a few hours a day, we were able to transform the space into a more functional and pleasant area. The books are easier to find and danger from heavy books falling from a top shelf was removed. Our efforts were appreciated by both the staff and the books! Summer is slowly approaching so it’s not too early to start thinking about your good deed project! Maybe one for “Preservation Week”. http://www.ala.org/alcts/confevents/preswk   

Tuesday, February 17, 2015

Custom Fitting A Box To House An Object

Our library collections hold books, but also other three-dimensional objects. These items (and even the books) are not always regular shapes that fit into commercially made housing. Sometimes we need to either build a box from scratch or adapt a purchased box to house these items. For example in 2012, we created housing for a collection of canes that required some adaptation to their rectangular boxes. There are many ways to adapt a box to hold objects, and a variety of materials can be used: Ethafoam, Volara, archival corrugated board, Tyvek, archival tissue paper, among others.

Recently a wooden cross from World War One needed special attention to house it safely. I documented the steps I took to adapt a commercially made box and have included a diagram to illustrate the mathematics of the interior boxes.

I started with a commercially purchased box that was slightly larger in all dimensions than the item.


My goal was to create a recess for the cross within the box by making interior boxes of archival corrugated board.


These interior corrugated boxes are designed to fill empty space to create the recess. They are glued shut and maintain stability by including a top (as well as a bottom), though the top isn’t strictly necessary. I calculated and constructed them based on the methods used in Andrea Krupp’s great instructions for the corrugated clamshell box, which I learned from Hedi Kyle.

When designing these interiors keep in mind where and how the item is stored (horizontally or vertically), how frequently it is handled, and how it can be removed from the box.

To create the interior corrugated boxes here are the steps I took.

1) With the cross in place, I measured the four quadrants of empty space on the box bottom. I subtracted ¼ inch from the length and ¼ inch from the width of each of those rectangles (this gives some breathing room to the cross for removal). Using the dimensions of the box bottom I adjusted my calculations so the two boxes on the left side were equivalent to the boxes on the right side boxes (as mirrored pairs). This simplified things by requiring only two sizes of boxes. I now had the length (L) and width (W) measurements. I then measured the large outer box depth for the thickness (TH) measurement. This should be very slightly lower than the box side, but keep in mind any additional layers of material (Volara, paperwork, etc.) that need to go over the top before the lid goes on and account for that in your thickness measurement.

Consulting the diagram I have drawn out while reading further might be useful.


Definitions used on the diagram:

L = length
W = width
TH = thickness
BT = board thickness
Solid lines = cut
Dotted lines = score/fold
Grey areas = cut away/remove
Tab = 1 inch

I chose to create a 1-inch tab for gluing my box together. Smaller boxes could certainly be made with thinner tabs.

Using my measurements (L,W,TH) and 1/8 inch archival corrugated board, I cut a rectangular board based on these formulas:

Height of board = 2TH + 2L + 1Tab + [4BT or 1”]

Width of board = 2TH + 1W + 2Tab + [3BT or 1”]


2) Then using the cutting and folding diagram I measured and drew out my box onto the board and cut.


A few tips:

Start measuring and marking lines from the same square corner (both horizontally and vertically).

It is easier to bend with the corrugations so keep that in mind when choosing which way to orient the board, though either way does work.

I used a scrap of board as a jig to mark my BT (board thickness) as I drew these lines out. You could laminate multiple pieces of board together to create a jig for easier measuring.

As you see on the diagram I have added a board thickness to each dimension (W, L, TH) to account for the walls and folds. I didn't add the board thickness to the three most exterior tabs since those tabs needn't be a precise size.

3) Once the box is cut out gently score the lines with a bone folder, and fold them up. Then the tabs need to be delaminated before gluing them down.

This board is made of three layers: flat paper, corrugated paper, and then another layer of flat paper. The corrugated paper in the middle of the tabs will be cut away and the two flat layers will be glued to the adjacent side, one on the interior and one on the exterior making for a strong and square attachment. You will be separating seven tabs: the four to create the box bottom and the three to attach the top to the sides.

4) Gently using a microspatula and/or an awl separate the layers.


You can also gently use your hands to pull these layers apart once you get them started.


5) When they are separated carefully bend the flat layers aside and cut the corrugated piece away.


6) Lay waste paper under the two tabs and apply glue, then fold up the side to create the 3D box and press into place. Do this to all sides of the box creating the box bottom.


7) Now prior to gluing down the top cut away two small areas in the interior tab coming off the top.


This will allow the tab to set inside the box without hitting the interior side tabs. Glue up all interior tabs (even though they may not adhere) and the exterior tab coming off the box top. Close box and press. Then glue up the remaining exterior tabs on the two sides and press.

Here are the first two boxes in place to check the fit.


After the four corrugated boxes were made, I set them within the big box. I checked the fit of the cross within the space to make sure all was as it should be. Then I cut Volara to fit into the recess so the cross was laying on something softer than the board. The friction between the Volara and the cross helps hold the object in place.


8) Once the parts were cut, assembled, and the fit tested, I first glued the corrugated boxes, then the Volara, into the box bottom with PVA.

I weighed down the corrugated boxes to ensure good adhesion.


After everything was dry the cross went into its new housing ready for the shelf.


Interior compartments can be constructed in all sorts of ways and materials. They can be adapted for use in basic or deluxe boxes. This is one method, and if you have another you would like to share, we’d love to hear it!


Written by Stephanie Wolff