Showing posts with label cleaning. Show all posts

Tuesday, May 3, 2016

Conserving Collaborators: making it work.

Last October, I had the pleasure of having Giselle Simon, Head of Conservation at the University of Iowa, in the lab for a day.  Giselle and I go way way back so it was just like old times.  I thought "What could we do in a day?"  I recalled that Giselle had treated many antiphonals when she was the Conservator at the Newberry Library in Chicago.  And it just so happens that we have one here that is displayed in the reading room of Rauner Special Collections in need of assessment and attention.  So how perfect, with Giselle's help (which this was definitely a two person job) we transported the antiphonal down the long corridors and elevator rides to the conservation lab.

All tied up and ready to go.  Rauner Special Collections reading room.


Being able to maneuver the pathway was tricky.

Getting the book into the elevator.  Tight squeeze.

Riding solo going down, no people allowed.

Once off the elevator, transport got a bit easier as we had a truck to put the book on and wheel away.

The goals for the day were simple.  To assess the book, perform some minor stabilization, and create a carrying/support tray.


Giselle using a HEPA vacuum to clean soiled surface.

Once we got the book situated, we realized that the surface needed quite a bit of cleaning.  Surface debris was evident in a substantial amount of areas.  Giselle hopped right in and gave it a go with her gentle touch.

In the paste down area there was extra surface debris which she was able to clean.

The back board was damaged at the fore edge, missing the outer portion of the board.  This resulted in the pages bending at the fore edge because there was no support under them.  Therefore we came up with a quick solution for a moderate fix.  We cut a strip of matt board that fitted precisely into the missing area and pasted it down with a tissue strip placed in top for a bit of extra strength.


Piece of matt board secured to fore edge of lower board.

 The next step was to fabricate a carrying tray.  We didn't have all the materials to make one like the Newberry so we improvised.


Carrying tray at the Newberry.  Coroplast lined with Volara.

Newberry tray showing a catch wall at the back.


Nothing like getting out the glue gun.  I knew I had bought that for something!

Multiple layers of blue corrugated board were laminated together to make the tray, then we adhered a sheet of Volara.  We also had time to relax and flatten some of the pages.  So in a few hours a lot was accomplished.  The antiphonal was returned at the end of the day in much better shape than it had been.  Because of the detailed inspection and keen team work the next steps are within reach and a game plan is laid.  Sometimes, those seemingly overwhelming big jobs, just need that initial step, and having a conserving collaborator around can be just the thing.

I've always fantasied about a conservator exchange program, whereby we could visit each other's labs to help on a project, to share our experiences, and to learn new techniques and approaches.  A week would be great, but I'll take a day!  Thanks Giselle.


Giselle, settling in!


Written by Deborah Howe


Tuesday, July 7, 2015

Storage Housings for Cased Photographs

Introduction


The Iconography Collection, which I have been working with this year, includes many non-traditional items, such as paintings and three dimensional objects, as well as items of various sizes. As this is a library, most of our storage spaces are divided into typical library shelving, and it can sometimes be a challenge with this type of collection to keep items in the desired order while using the available space efficiently and providing proper protection for the objects. This subject was also addressed in the recent Northwestern University "Beyond the Book" Blog Post by Stephanie Growler, entitled "Fitting In: Storing Objects in Library Stacks" .

I was inspired by this blog post to create a folder structure, similar to the one depicted for petri dishes, during my rehousing project for a collection of cased photographs within the Iconography Collection. While this group of cased photographs is considered a single item, as it is cataloged under one item number, Iconography 1507, it includes over 75 cased photographs, mainly daguerreotypes and ambrotypes and a few tintypes.


Ambrotype on the left, daguerreotype on the right, missing cases.
 

Example of an ambrotype in an unusual case with two openings.

I wanted to improve the housing because the cased photographs were placed haphazardly in two boxes and were housed in poor quality envelopes. They were not properly enclosed or protected and were poorly organized, which increased the risk of damage and dissociation.

Iconography 1507 Box 1, cased photographs stored in envelopes.

The Challenges


- Utilize the same exterior boxes so that the objects will occupy the same space on the shelves.

- Objects needed to be stored vertically. Housing objects horizontally was not the best option for the space, given the large number of small items, and the objects needed to stay in the same place on the shelves in order to maintain chronological order.

- Housing items individually on the shelves was not ideal because this would have resulted in many small, loose items, as well as inefficient use of the space.

- Standardize the housing for a majority of the objects. Most objects were 3 3/4" x 4 3/4" or smaller, but several were larger.

- Keep the objects in alphabetical order within the boxes while meeting other goals.

- Create secure, durable enclosures with archival (non-damaging) materials.

Solution

-Decided to modify pre-made folders to fit approximately 2 cased photographs per folder, with two folders fitting next to each other inside of the box. This allows for enough protection while taking up less space than pre-made standardized boxes. Using pre-made folders also saves time and expense.

        - Bonus: Only 3 items did not fit inside the chosen folder size, which meant the folders could be           mostly standardized. Out of 35 folders, only 3 required larger dimensions.

Overall view of modified folder containing two cased photographs.
 
-Used blue corrugated board scraps for the walls of the boxes. This gave me the opportunity
to use up many scraps, while providing added protection for the objects.

-Added Volara on lids, custom fit to the individual compartments, to create added support and pressure.

-Added Mylar strips to lift cased photographs up and out of compartments, or thumb-slots if possible.

-Embedded Velcro in walls of folder. This allows the folder to be flush on all sides and does not
take up more space. However, the Velcro is time-consuming to attach. We used PVA which took a long time to dry, and was not always immediately successful if not enough PVA was used.

Interior view, showing two daguerreotypes.

Once I had completed a prototype and determined a workflow, Deborah Howe and Stephanie Wolff helped to make many folders, which made the project go quickly!

Deborah Howe and Stephanie Wolff helping to make custom folders.

Tips for batch construction of folders


1. First group the cased photographs in pairs according to alphabetical order and size to determine the      number and size of folders needed.

2. If trimming the folders so that two will fit adjacent in the box, do not use the spine to square the         edge! The spines are cloth and are irregular. Use the boards only, otherwise you can end up with off-square, irregular folders.

3. Calculate the number of strips of corrugated board you will need in which sizes, then cut these
    standardized pieces accordingly. This takes time, but it is worth it. Extras are also good idea.
 
         a. In general, avoid making strips thinner than 1 inch. If walls need to be thinner than this,                        then turn on their sides.
         b. Avoid leaving space in the joints between the walls, and make sure the walls are as flush as                  possible.

4. Use a tape gun or double-sided tape to build walls from corrugated wall pieces.

5. When attaching the walls to the folder use PVA. At first I attached to the bottom of the folder            using double-sided tape, but found this resulted in an unstable structure. PVA in the joints between     the walls is also key.

6. Cut space on top of a wall for Velcro, and use sandpaper on lid to make slightly rougher surface.         Attach with PVA and weight. This will likely need about 8 hours to dry, but longer is always               better.

7. It is recommended that you allow the Volara to dry under a good amount of weight, then close the       box and weight more. Otherwise, you can may get a lot of warping of the lid.

The design may be modified slightly (and easily) to accommodate cased photographs of different sizes:


In the end, we made 35 folders. Of these, 16 folders were exactly the same inside and out, 32 have the same exterior dimensions. Only 3 needed larger folders, which are oriented horizontally.

Both boxes, filled with cased photographs in new folders.


Written by Tessa Gadomski

Tuesday, March 31, 2015

Structural Intervention: Treatment of Albums from the Iconography Collection

As a Samuel H. Kress Conservation Fellow, I have been spending my first post-graduate year revamping Rauner’s Iconography Collection. The Iconography Collection is an image-based collection which includes prints, photographs, negatives, albums, and various other materials.  In my initial survey of the collection I found that a number of the top treatment priorities were albums.  I decided to focus on treatment of these albums not only because they were in poor condition, but also because this allowed me to further explore my interest in album structures. 

Example of a damaged album discovered during the survey.

   
In conservation we try to preserve the original structure of the books we work with, but there are times when the original structure is inherently problematic and must be altered to prevent future damage. I have found that this is especially applicable to albums.  A common condition issue was that either one or both of the boards were detached. 


For the album shown below, I successfully reattached the boards and preserved the original structure of the album.  The detachment occurred between two of the front pages, and the spine covering had pulled away from the text block.  I cleaned the old adhesive from the inside of the spine covering and the spine of the text block, and then placed new linings on both.

Carte-de-visit album before treatment, showing detached front board.

 Here you can see that the new spine lining was used to successfully reattach the front board.
  
Carte-de-visit album after treatment, showing reattached front board.

  
However, for some of the other albums treated, such as the next example shown below, I decided that returning the album to its original structure was not the best solution.      
  
Carte-de-visit album before treatment, showing detached front pages 
and detached cover.

While I placed a new lining on the text block spine and attached the text block to the back cover, I chose to leave the front board detached. Reattachment would have made the album too difficult to open and would have caused it to break again in the same exact manner. 
  
Carte-de-visit album after treatment, showing reattached front pages and front cover 
left purposefully detached  (back cover has been attached to the text block).

My favorite album from the collection features stunning watercolors from 1857-58 made by Sir Henry Hugh Clifford, who was stationed in Canton, China an Assistant Quartermaster General in the British Army.  While Clifford was stationed in China to serve in the Second Opium War, his meticulous paintings capture serene and colorful landscapes and portray scenes of everyday life in China.

Watercolor painting by Sir Henry Hugh Clifford entitled "Chinese Junk"

As we are nearing the end of a long, cold winter, this album has been a treat to work with, and has led me to start fantasizing about warmer weather and beaches.

Watercolor painting by Sir Henry Hugh Clifford entitled "Sunset, Victoria".


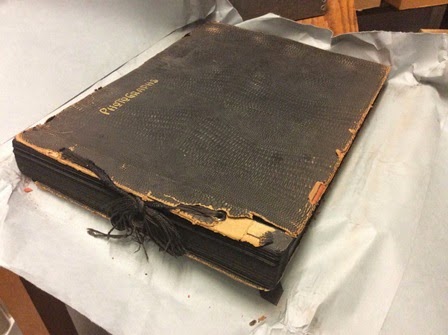
Prior to treatment, the album was bound in a post-style binding.  After close examination, it became clear this was not the original binding structure and the cover did not add informational value to the object. 

Overall image of album: please note the significant amount of
surface dirt on the pages in the upper right.


Detail of post binding structure: cord strung through two holes through
text block and tied together, pages are not secure.

We decided that removing the album from the binding completely and storing the leaves in an enclosure was the best solution, because this will allow for easier access and prevent strain on the pages.  While dis-binding the album, I conducted dry surface cleaning of the pages to remove the highly noticeable, easily-transferable dirt.


Dry surface cleaning a page from Sir Henry Hugh Clifford's album using
cosmetic sponges.

Album page after surface cleaning.
Album page before surface cleaning.


Collectively, these treatments show that, while we strive toward minimal intervention, altering the structure of bound materials is sometimes the best course of action to prevent further damage. 


Written by Tessa Gadomski


Tuesday, March 3, 2015

Good Deeds from Conservation

Summer can be a good time to reach out and do those special projects that have been on the back burner. One of those projects for us was the Art Oversized collection housed in a small room that struggles with environmental conditions. When there I would upload temperature and humidity information from the data logger and I noticed how the books were shelved.  During these summer terms we often have students working every day with longer shifts. Last summer we were fortunate to have a student working with us who was interested in conservation and wants to have a career in the field. So I thought this would be good practical experience in basic conservation outreach, getting a lot of bang out of a little muscle and sweat.


Oversized material poses a challenge when it comes to shelving. We are fortunate to have shelves that are designed for these types of large items. But how should they be organized and kept safe?

  
Large heavy books were located on top shelves which made them difficult and potentially dangerous to retrieve, and large thin portfolios were unable to lie flat.
  

Over time disfiguration can occur when a book is slouched or forced into an awkward position.


So to begin the process I approached the curator and proposed that over a course of a few days the student and I could come in and clean and tidy up in order to return the books to a more fitting posture and refresh the very small space.  The offer was well received as the staff there has no time to address such a project.


We brought in a small vacuum, a book truck, face masks, gloves, ear plugs, lab coats, a spray bottle and lots of paper towels. The books and shelves were quite dusty so we needed to do a good amount of cleaning. Working as a team was the best way to go. I had done this type of project when I was a student, along with a co-worker, and we ended up making a lot progress and having quite a good time. 
  

We started at the top of one end of the shelving and worked our way down and over. One person would do an initial vacuum over the books and shelf and then would hand the books to the other person who would put them on the book truck. The books would then be vacuumed more thoroughly moving the nozzle across the surface and around the edges in a forward motion. Our colleagues at the University of Washington created this nice video on cleaning if you are interested in more details on cleaning books: http://www.lib.washington.edu/preservation/preservation_services/clean


The other person would mist a bit of water over the bare shelf to minimize the dust from spreading, and wipe it dry removing the dirt and dust. Books were then returned to the shelf. We did have flexibility to slightly alter the location of the books, so when very large heavy books were on a top shelf we could relocate them to a lower shelf. We were also able to reunite sets of books that had gotten separated.


We were careful to take breaks and not spend too many hours in a single visit.


So over a course of a few days, working for just a few hours a day, we were able to transform the space into a more functional and pleasant area. The books are easier to find and danger from heavy books falling from a top shelf was removed. Our efforts were appreciated by both the staff and the books! Summer is slowly approaching so it’s not too early to start thinking about your good deed project! Maybe one for “Preservation Week”. http://www.ala.org/alcts/confevents/preswk