Showing posts with label media preservation. Show all posts

Tuesday, June 23, 2015

Baker Library in the Dartmouth College Photographic Files Collection

During the month of May, close to 1500 photographs of Baker Library were added to the Dartmouth College Photographic Files Collection. Included are many photos of the Baker Library building, interior and exterior, including its construction, as well as people that have worked here over many years. Here are some samples:


View a much larger selection here.

The Dartmouth College Photographic Files project began in early 2012 and is part of the Dartmouth Digital Collections. The project's goal is to make over 80,000 photographs stored in file cabinets in Rauner Special Collections available online. Images date from the early years of photography (ca. 1850s) to the present and include images of nearly all aspects of Dartmouth College life. To date there are over 36,000 photos from the collection online. We add approximetly 1,000 photographs to the collection every month. We are working through the photographs alphabetically and have reached the letter "M". See additional photographs of Feldbery Library; Dana Biomedical Library and Kresge Library.

If you have questions about the Photographic Files Collection contact Rauner Special Collections If you have questions about the ditital imaging of the collection contact William B. Ghezzi or Ryland Ianelli in the Digial Production Unit.

Written by William B. Ghezzi


Tuesday, September 30, 2014

100-ish Days of Digital Preservation

Hello, there. It's been a little over 100 days since I started as Dartmouth College Library's first Digital Preservation Librarian. I've been working closely with staff in many departments to define my role and work out how best to ensure long term access to the Library's digital content. Here are some of the things that I've been up to:

  • Maxed out our master file server space.
  • Learned about awesome projects and connected with colleagues at Digital Preservation 2014.
  • Made some head-way into assessing our e-resource preservation strategies.
  • Used BagIt to package 45,000 files totaling 2413 GB for long-term storage (see above re: maxing out server space).
  • Started digging into PREMIS .
  • Learned to harness the power of Twitter for professional research #digipres .
  • Started brainstorming strategies for preserving analog and born-digital a/v content.
  • Dipped my toes into web and database preservation in response to a faculty inquiry.
  • Got really excited about sustainability and digital humanities projects.
Digital Preservation Brainstorming!

 I’m looking forward to my role in the Library continuing to evolve and grow over time. As these and other projects develop, I will tell you all about them here. Stay tuned for the next 100-ish days of Digital Preservation!


Written by Jennifer Mullins

Tuesday, October 8, 2013

Manage Your Photos with Adobe's Bridge and Lightroom

If you decide to digitize a collection of images, such as a photo album or a slideshow, there are literally thousands of different software solutions to go about organizing them. Many of these can come bundled with scanning or photo software, and often those can offer a relatively low-cost and hassle-free solution to keeping track of your images.

However, if you want to ensure the maximum compatibility and usability of your images over the long term, there are more advanced options available through Adobe's very popular line of professional software. The complete Creative Suite (and the newly-offered Creative Cloud) feature an almost overwhelming amount of tools, from film editing to website design, along with the nigh-essential Photoshop.

Two of these programs are designed for the main purpose of organizing and viewing large collections of images; something you might imagine is essential to the kinds of digitization projects taken on by the Dartmouth College Library's Digital Production Unit. Adobe Bridge and Adobe Lightroom each offer distinct advantages over the other, and while they may share some purposes, it can save you a lot of time to know which one suits your project best.

Adobe Bridge is, as its name implies, an excellent way to organize many different kinds of media, "bridging" many formats. It is designed to play nicely with all other Adobe programs, and offers an excellent alternative to the standard Mac OS Finder, or Windows Explorer when it comes to browsing collections. The interface can be altered modularly to suit a project, meaning you can re-size, add or delete tools from the main screen with great ease. Additionally, you can add or alter image metadata, and do batch file renaming. Its flexibility is its best selling point, making it a helpful addition to any Adobe-based workflow.

Lightroom, on the other hand, is designed specifically for photographs. In addition to letting users browse through collections of photographs, Lightoom offers far more tools for photo-editing than Bridge, and presents them in a way that is familiar for professional or amateur photographers. While at first blush this would appear similar to running a combination of Bridge and Photoshop, it actually has a few interesting tricks of its own.

The most important thing about Lightroom is to think of it within the context of a photographer's studio. The program is designed to take raw camera files (.dng is the most common format) and apply various changes to it without altering the originals. The entire editing action takes place within the Lightroom environment, so you are never in danger of losing data. You can think of your raw camera files as digital negatives, to be used and reused to create different print files. Lightroom easily stores setting data, allowing you to export as many kinds of derivative files as are needed. However, it is designed around these features. If you want to make actual changes to a master document you'll have to use Photoshop.

Between these two programs we can respond to all kinds of challenges in the Digital Production Unit, organizing and reworking files in the manner best suited to the project.

Written by Ryland Ianelli 

Tuesday, July 30, 2013

Slide Scanning Tips

When I was an undergraduate student I worked in my college library’s Visual Resource Collection in a somewhat similar position to the one I’m in now. The VRC was primarily a resource for my school’s Art History Department (my major), and their main asset was row upon row of metal filing cabinets filled to the brim with 35mm slides.

As the years went on, we unsurprisingly saw more and more art history professors moving towards digital teaching tools. As such, the VRC department had no choice but to move with the times and focus on the digitization of their existing collection.

This was my first experience scanning 35mm slides, and while it fundamentally follows the same principles as scanning anything else, there are some considerations to be made. The main question is one of scanner preference: mechanical feed or flatbed?

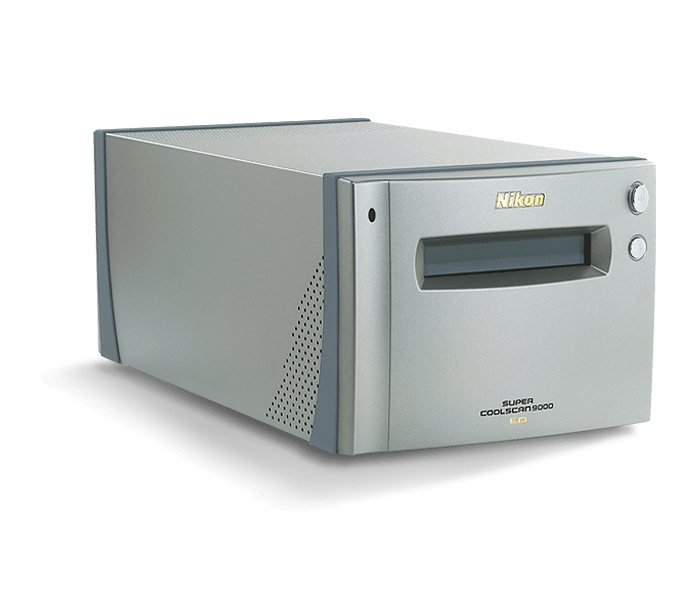
Nikon Super COOLSCAN 9000 ED; a professional-quality mechanical feed slide and negative scanner I used at my previous job. Image copyright Nikon USA.

Mechanical feed slide scanners have several distinct advantages: they are smaller and very easily portable; they are often designed to accept large batches of scans in a workflow environment; and they require very little adjustment or calibration on the user end. However, there are drawbacks as well. Much like the mechanical feed photo scanner, it is prone to dust. This dust is significantly more troublesome in the final product due to the small size of the originals. Additionally, the user-friendliness can sometimes translate to poor customizability. And of course, the slide scanner’s utility is limited to 35mm slides or film negatives.

The Epson Expression 10000XL, with transparency unit and slides ready for scanning

While flatbed scanners are designed with larger printed material in mind, often times these too can accept slides or photo negatives with certain peripheral attachments. In the Dartmouth Library Digital Production Unit, our Epson Expression 10000XL flatbed scanner has such attachments. The biggest and most crucial is the transparency unit. This piece replaces the original scanner cover with what is essentially a lightbox, backlighting the slides and providing consistent illumination. Additionally, there are slide and negative holders that help keep your images consistent.

The biggest drawback to the flatbed scanner is that sometimes the scanner itself has not been designed for the high-resolution settings required to scan such small objects at archival quality. Usually a good resolution for 35mm slides is 2,400 dpi; four times the resolution of our usual scans. A good high-quality scanner should have no problem with this, but many consumer-level scanners simply can’t scan a resolution that high.

While our Digital Production Department has not had much reason to incorporate slide and negative scanning into our workflow thusfar, it can’t hurt to be prepared for whatever digitization projects come our way.

Tuesday, December 4, 2012

Digital Production: Tools of the Trade

Today I'd like to highlight the Digital Production Unit, a cozy corner of Baker Library where we, along with the crucial help of many other library departments and staff, help to bring digital content to the Dartmouth community.

Baker 02: where the magic happens

Any good workshop needs the right tools for the job, and ours is no different. As I mentioned in my post about Optical Character Recognition, the Digital Production Unit deals with a very wide variety of library materials, from 18th century manuscripts to an audio lecture by J. Robert Oppenheimer and related materials. It is a simple fact that Dartmouth Library's Special Collections have a fantastic variety of useful scholarly objects, and it behooves us to be as versatile and efficient as possible in bringing these into digital space.

Scanning workstations

Our most commonly used pieces of equipment are our two flatbed scanners: the Epson Perfection V750-Pro and the Epson Expression 10000XL.

Epson Perfection V750-Pro

The Perfection V750 is an excellent consumer-level machine. It's small, relatively inexpensive, and perfectly able to create high quality images up to our standards. Most importantly, this scanner has a considerable speed advantage when compared to...

...the Epson Expression 10000XL

The Epson Expression XL is, first and foremost, a significant upgrade from the Perfection in terms of scanning area, which is over twice as large as the Perfection's. It is also a very versatile machine, with attachments for scanning photographic negatives in addition to the usual capabilities. In terms of scanning quality the two Epson scanners are roughly equal, however, due to the Expression's larger scan area, it has a significantly slower scanning speed, which can become problematic on time-sensitive items.

Kodak PS810

The other crucial piece of equipment in our lab is the Kodak Picture Saving Scanner System PS810. This scanner has a much more specific function than the Epsons. Its strength is speed; the feed tray can pull through and scan several photos per-minute, indeed, hundreds in a single operation. This is incredibly useful in dealing with our biggest project yet: the Dartmouth Photographic Files, an impressively large collection spanning back to the very beginnings of the College's photographic records.

While this scanner excels at scanning many documents quickly, it is even more limited in scanning area than the Epson Perfection. Not only that, but items must be under a certain thickness in order to pass through the feed safely. Additionally, it can only scan at 24-bit color (as opposed to the Epson scanners' 48-bit colors), which renders it ineligible for many projects. While these drawbacks make it somewhat limited in applications, it performs very well when properly maintained (our procedures have it cleaned daily, and sometimes more often than that).

In addition to the equipment in Baker 02, we also have been known to occasionally borrow other library resources in accomplishing our goals.

The Indus Color Book Scanner 5002

This overhead-style scanner is exceptional for scanning entire books, as its adjustable platform can accommodate different-sized spines. Another advantage is speed; this scanner works similar to a camera, snapping a single digital picture and transferring it to the computer. The biggest disadvantage is image quality; like the Kodak scanner, its limited to 24-bit color.

The Vidar HD4230

Finally, for oversize documents we've had occasion to coordinate with the Evans Map Room and make use of their feed-scanner, the Vidar HD4230. This scanner creates very high quality images by feeding larger documents through it, rather than passing lamps over stationary documents, like a flatbed scanner does. The speed of scanning is relatively slow, and must be done carefully to insure the document's safety. However, for many projects such as the Sanborn Fire Insurance Maps of New Hampshire, this scanner is the only option to ensure the quality of images over a certain size.

Using these tools, and with the invaluable support of many library staff, we've been able to adapt to the myriad challenges in Digital Production. Personally, I look forward to what further challenges await.
Written by Ryland Ianelli.

Tuesday, October 23, 2012

Encapsulation: Too Close For Comfort

As part of a digitization project to scan historic maps of New Hampshire, selected maps are being reviewed here in the Conservation lab. Each week I gather fifteen maps from the Evans Map Room in Baker Berry Library and transport them to Conservation. Since the project workflow as a whole spans multiple departments in the library, a database with a listing of maps by call number is used for tracking. For each group of maps I can enter information about conservation review, necessary treatment, and their current locations.

For the past few weeks the majority of maps reviewed are in good condition and already encapsulated. Encapsulation is a great solution for flat items, small or oversize, especially if they might be handled often. There are two methods of encapsulation, welded and taped. Welded encapsulation is preferable, however, it requires specialized equipment, whereas the taping method can be done anywhere. Taped encapsulation is generally done with narrow, acid free double-sided tape and mylar. A reasonable margin should be given between edges of the item and the tape. A drawback with taped encapsulation is that over time an object can shift inside the mylar and come in contact with the tape. To avoid this, and the potential for damage, a wide margin between edges of the item and the tape is recommended. Whatever the method, welded or taped, once encapsulated objects are better protected from moisture and handling.


The rough edges on this map are caught in the tape. A wider margin would allow this map to float inside the mylar.


Tape will make a better seal if thread from linen backing are trimmed prior to encapsulation.

Items with folded edges should be flattened first, then encapsulated.

Written by Elizabeth Rideout.

Tuesday, October 9, 2012

DJ: Spin that Disc!

My father was a DJ, so growing up I was surrounded by LPs and at an early age I was taught how to handle and clean the vinyl discs that spouted the music of the Moody Blues, Rolling Stones, and Harry Nilsson's "The Point".

Recently, the conservation lab was besieged by a large collection of discs that had an odd surface coating of a white waxy residue. The discs were being processed as part of a Robert Frost collection located in Rauner Special Collections Library, and contained recordings of interviews and lectures of Mr. Frost at Dartmouth College.

With a first go around on the internet I came across detailed information on how many variations of disc manufacturing there are: vulcanite, shellac, Columbia, Edison, vinyl, and acetate, which is the least stable one. These have an interior base of aluminum or glass and sometime cardboard. These inner cores are coated with nitrocellulose lacquer plasticized with castor oil. It seemed that most of what we had were indeed acetate.

The white substance was something I had never seen and my previous knowledge of how to clean albums didn't seem applicable to these. At first some of my colleagues thought the substance was mold but on further investigation and inquiry I came across this great dialog between Anji Cornette, The Cutting Corporation, and Alan Lewis, National Archives and Records Administration, and based on what they said I determined that it must be palmitic acid. "The production of palmitic acid is caused by the hydrolysis of the castor oil from heat and humidity, which then oozes through the lacquer on a disc. The specks or small mounds on the groove look similar to powder residue but have a more crystallized appearance. Palmitic acid is stubborn to remove and requires extensive cleaning."

Realizing that this was more than a simple cleaning, I contacted The Cutting Corporation. They were great and very forthcoming in talking about the whole process of deterioration and the different service options.

Once we chose to send out the discs for cleaning, Aaron Coe, our contact there, worked with two Rauner staff members to decide if they would have a digital copy made in addition to cleaning (which we did). All transactions went smoothly and Aaron sent me a set of photos of the cleaning (thanks Aaron!). The discs have been returned and we are now able to listen to the voice of Robert Frost.


Additional Sources:
Written by Deborah Howe.

Tuesday, November 29, 2011

Association of Moving Image Archivists Conference

The Association of Moving Image Archivists is the professional organization for those who are involved with preserving and making accessible film and video. I attended the recent conference in Austin, TX and came away with a couple of good tools:

Hannah Frost from Stanford University presented this new tool, the AV Artifact Atlas, for understanding video and audio technical issues. The goal is to create a reference work with examples so that non-technical folks will be able to identify what is wrong with their video, learn the cause of the problem, and confirm if there is anything that can be done to correct it.

The tool is actually a wiki and will eventually be open for additions from the audio-visual community. As someone who is coming to film and video preservation without a technical background this is a fantastic guide to help me talk to media experts. For instance, I’d never heard of “quilting” other than as a hobby but now I know how to recognize it and sadly, that it can’t be corrected.

The National Archives has made public their guidelines for reformatting materials and the context for the digitized items that they produce. I’ll be looking at these documents with a goal of updating Dartmouth Library’s digitization specifications and to develop a media preservation guide. This will also build on the ideas Helen picked up at DLF, detailed in the session notes from Strategies for Film and Video Digitization.

Finally, clips from “The Orozco Mural Quetzalcoatl” were shown both at the Reel Thing technical session and Archival Screening Night. Russ Suniewick of Colorlab showed some before and after footage to demonstrate how they were able to restore the film to its original color after it had experienced magenta dye-fade; I showed a four-minute clip at Archival Screening Night as a teaser for the Spring 2012 world premier. Watch this blog for that announcement.

Written by Barb Sagraves