
We recently hosted Renate Mesmer, Head of Conservation at the Folger Shakespeare Library, for a workshop on The Use of the Suction Table in Book and Paper Conservation. Co-sponsored by the Dartmouth College Library Preservation Services and The New England Chapter of the Guild of Book Workers we spent two full days watching demonstrations and trying our hands at flattening, stain reduction, pulpfilling, washing and drying of paper, and paper repairs. Renate provided packets of handouts elaborating on the techniques, and her slide presentation reinforced the concepts with clear diagrams and explanations about the microscopic effects of water on paper. One reference that will be very useful is the book Paper and Water by Irene Brueckle and Gerhard Banik.
The suction table is a new piece of equipment in our lab and will be a very useful tool.

We covered many ways to use a suction table during the workshop, including making paper for repairs. Why make your own paper? Sometimes an item has a lost corner for example. You can attempt to find a match of an appropriate weight and color from your stock of commercial Western handmade papers, or decide to use an Asian paper, but another option is to cast your own paper. This way you can alter the color and weight to match your item. Renate covered a number of ways to do this using the suction table, and one way that uses very little equipment. Since not every conservator has access to a suction table I thought I would explain the basic method of this low-tech papermaking technique.
First take Western handmade paper scraps and tear them up. Soak them overnight in water. I thought I would separate them into their four tones so I could vary the color when making the sheets.

Then take each batch of soaked paper and beat them up in a regular kitchen-style blender.

Once they have been well blended you have a slurry. You want to make sure the slurry is fine enough to eliminate the possibility of lumps in your paper.

Now set up your papermaking station. You will need:
• two large thick sponges (if they are new, make sure you
rinse them thoroughly to get out any soap
or other deposits)
• a set of two
containers the same size (one to hold the pulp, the other will become a tube to
be the “mold & deckle”). Plastic containers work well for this. The size of
the opening is the size of your paper piece, so they must be smaller than your
sponge. Cut off the bottom on one of the containers so you have a tube.
• 2 pieces of Remay cut slightly bigger than your sponge.

Once you have your pulp slurry ready, it is time to make a
sample piece. Measure out a specific amount (such as a teaspoon, tablespoon,
etc.) and make a note of this. Place it into the plastic container (the one with
the bottom) and add water up to the top. Stir this up so the slurry is dispersed.


Pre-wet sponges and wring them out. Wet the Remay also. Then take your two sponges and pile them on top of each other, then the Remay, and then your other plastic container tube on the very top.
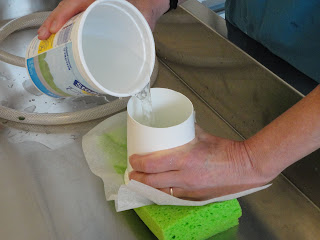

With one hand push down compressing the sponges, with the
other pour the slurry into the tube. Now holding the tube with both hands
slowly release the pressure on the tube, allowing the sponges to release to
their regular thickness. Do this slowly.

The water will seep out the bottom as the pulp is drawn down
onto the Remay. Soon the water will be all gone and the pulp will be
distributed on the Remay forming a petite
sheet of paper. Now carefully remove the plastic tube.


Take the second sheet of Remay and cover the newly formed
paper. You can flatten it through the Remay with a wide bone folder if desired.
Press between blotters and dry.

Once you have dried the sample, you have a basis to
figure out the thickness and color of paper you can make with that slurry. In
other words, that particular amount of slurry (whether a teaspoon, tablespoon,
etc.) using that particular plastic form will create the thickness and color of
that sample you made. By keeping careful notes you should be able to alter the
recipe to adjust these variables to make new paper that closely matches the
item in need of repair. Consider weighing the paper pieces or measuring the
square inches of the paper that goes into the original slurry mixture and noting down the amount of water in the original
slurry mixture. Do not alter the main slurry batch once you have made your sample.
Change the amount of slurry you add to each sheet’s formation to alter the
thickness of the sheet. To change color change proportions of the various
colors of pulp added to each sheet’s formation.
If you prefer you can make a variety of paper pieces to have
in stock for future repairs, rather than making paper for a specific repair.
One other option for this kind of paper casting includes
masking off areas of the Remay under the tube to fit specific areas of loss. Instead
of tearing a paper to fit an edge, you can make a piece of paper with the edge
formed to fit the missing edge. To do this copy the edge you want onto Mylar and cut
that and a matching piece of Remay. Place the formed edge of the Mylar/Remay within
the boundaries of the plastic tube, extending these pieces out from under the
tube. (By cutting these oversized to stick out under the tube they stay in
place.) Continue to make the paper as usual. Once the paper piece is dry, the
Remay and Mylar can be pulled away leaving an edge that fits into area that’s
missing from the original.
Once these paper pieces are made, they can be attached using
conventional practices, such as with wheat starch paste.
The sponge in this technique stands in for the action of the
suction table. With or without a suction table, the idea of casting your own
paper for repairs and losses is a nice option to have in my toolbox of
techniques. Thanks Renate!
Written by Stephanine Wolff
Written by Stephanine Wolff
What a really informative article. Definitely one to try. Thanks.
ReplyDeleteFantastic article and very informatively illustrated. Many thanks.
ReplyDeleteI love this, thank you...............Alex
ReplyDelete