Tuesday, March 27, 2012

Book Arts Prize for 2012

The Book Arts Prize is a juried award given every year in recognition of excellence in the creation of a hand printed and bound book, letterpress printing, or hand binding made in the studio of the Book Arts Workshop. Deadline for entries is June 1, 2012.

Prizes will be awarded for the following categories:
  • Book Arts Grand Prize: $500 Awarded to a Dartmouth College undergraduate who combines letterpress printing and hand book binding to create an original book. The book should be letterpress printed and bound in the Book Arts Studios.
  • Letterpress Printing: $150 Awarded for the best example of letterpress printing produced in the Letterpress Studio by a Dartmouth College undergraduate or graduate. Submissions may be a single broadside (minimum dimensions 14" x 17") or a collection of at least three printed items.
  • Hand Bookbinding: $150 Awarded for the best example of a book bound by hand in the Bindery Studio by a Dartmouth College undergraduate or graduate. The book may contain blank, letterpress, or digitally printed pages. The text will be judged only in how the binding relates to the book's content.

For more information or a submission form visit the Book Arts Workshop Prize page.
Written by Barb Sagraves.

Tuesday, March 20, 2012

Toning Book Cloth and Basic Color Mixing

As part of this term’s Book Arts Workshop core theme of color related techniques, I taught a workshop this term on toning book cloth. There are many applications for custom-colored or custom-made book cloth in both artistic work and conservation.

Here in the conservation lab, the most common use is a spine repair on a cloth-cased book. The repair uses a color-matched piece of muslin to replace a broken spine or hinge. The result is a visually unobtrusive repair, which is great for many of the older cloth bindings in the library. Our simple process for toning book cloth uses basic tools and materials, and is easy to set up.

To prevent strike-through when applying glue or paste in the final use, spread out the material on a hard, smooth surface (counter top, plexiglass, or Mylar). With a large brush, give the material a good coating of methyl cellulose and allow to dry before peeling it up. Once dry, it will separate nicely from your work surface. The methyl cellulose will have dried shiny and smooth on the bottom, creating a good barrier and surface for gluing out your material.

The next step is applying color, which can be done in one or multiple layers. In the lab we use acrylic paints which dry quickly and true to color. Mix the paint to best match the book being repaired. A small amount of methyl cellulose can be added to the paint, which makes it easier to spread. With a large paint or paste brush, paint the mixture onto the more textured side (the side that faced up while the methyl cellulose dried). If the color seems pale, add more paint to your mixture and/or additional coats after drying. When toning is finished and the last coat is dry, it is ready for use.

Here are some tips on basic color mixing:
  1. You can make any color you need by mixing different combinations and amounts of three primary colors and then altering the new color with black or white.

    Primary colors: Red, Blue, Yellow
    Secondary colors: Violet (purple), Green, Orange
  2. Make secondary colors by mixing equal parts of two primary colors.

  3. There are many gradations between each primary and secondary color on the color wheel. Any three of these together is an analogous color scheme. Mix them by gradually adding a little at a time of one color into the next.

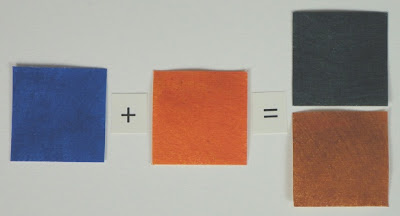
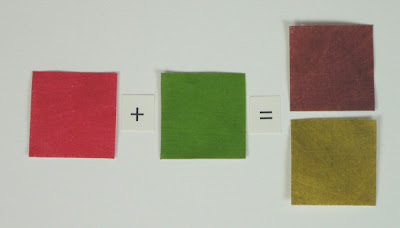
  4. To “dull down” a color or make it more brownish, add a small amount of its compliment (the color directly across on the color wheel). Example: to dull down blue add a little orange, etc.

  5. To make a color lighter or darker, add white or black. The new color is a “tint” or “shade”, respectively, of the original. Example: red + white = pink / tint of red, and blue + black = navy / shade of blue.

    Tints:


    Shades:
Written by Elizabeth Rideout.

Tuesday, March 13, 2012

Conjuring Pages from Thin Air

One of the more unusual tasks Preservation Services handles for the library is replacing pages in books. It’s an unfortunate truth that pages from library books occasionally get damaged or disappear. Sometimes this is accidental…I’ve seen pages that were torn or gnawed on by a pet. Sometimes it is intentional, with pages torn or cut out for personal use or simply as acts of vandalism (please don't do this to library books!).

Fortunately, Preservation Services can miraculously make these missing and damaged pages reappear! Well, sort of. If a large number of pages are damaged, we sometimes just have to replace the entire book. However, if only a few pages are missing we have a pretty great solution to replace only the needed pages. Here's an example of the page replacement process in action:


Here's a book with the corner ripped off of a few pages. The damage isn't extensive, but it does mean some of the text from those pages is missing. Other than these pages, the book is in good condition, so there's no need replace the entire volume.

The first step in the replacement workflow is to order the same book through inter-library loan, using Borrow Direct or DartDoc. We make sure to get the exact same edition so the pages will be identical. Here are those same pages in the borrowed book, still intact:


Then we scan the pages we need from the borrowed book, do some cropping and color correction of the image, and print out the scanned pages onto acid-free, alkaline buffered paper. This ensures that the new pages won't cause acidic degradation when inserted into our book.


We cut the old, damaged pages out of our book (please note, we are trained professionals; please do not attempt this at home on library books or your own books of value!). Then we trim the newly printed pages and "tip them in" to our original book. Tipping in simply means gluing the pages into the book, using a very thin line of PVAc glue along the spine edge of the paper (see slightly blurry glue line example below).


Here's our book, with the new pages tipped in and ready to go. It's almost like it was never damaged!


Of course, we don’t replace missing pages without careful consideration of the context. Even if they were severely damaged, we wouldn’t cut pages out of a rare or valuable book to replace them with scanned facsimiles. In a case like that, we would much more likely leave the original pages and add printed scans of another copy to the book’s housing, so people could read the content on the facsimile while still seeing the original pages of the book. But for heavily used circulating materials, this is a pretty nifty solution to a common library problem!

Written by Helen Bailey.

Tuesday, March 6, 2012

Team Work

One of the great things about my job is the chance to work collaboratively with many people across the library system, especially my colleagues in Rauner Special Collections.

One of the more recent projects we addressed was reevaluating the housing and use of Dartmouth's Dr. Seuss collection. This collection is from Theodor Geisel’s early days of advertising, and consists of many varied items.

The collection had been assembled over a period of time and so some of the items were stored in folders and then placed in boxes, some were matted and then placed in a sturdy box, and other items were simply loose in a box.

In order to assess the collection for housing needs with anticipated use in mind, we met with the person in charge of the collection and the person who oversees the care of it. Here we are looking at the different type of materials to see what there is:

Being able to discuss how the collection will be used is valuable information to have when deciding what type of housing to create. For instance, a collection of copy work ready for press had all been matted in very thick mats and then housed in a heavy box. These items didn’t need to be framed, and through discussion with the staff it was decided to remove the art from the mats and store it in a file folder, thus making it easier to use and freeing up quite a lot of space.

Some items, such as the one I'm looking at in the picture above, had good housing like this Mylar cover. However, the Mylar sleeve was open on three sides, which meant the item kept slipping out of it during use. So we were able to seal up one of the sides to create an “L” sleeve using our ultrasonic encapsulation machine. At the same time, we fabricated other Mylar sleeves for some of the over-sized items, such as the “Flit” poster seen above, which was taken out of the black matting.

This is a small group of similar material that needed to stay together, so we re-foldered it and placed it in a document folder. Without input and information from the curators, such as which items need to remain together, it can be impossible to make the best choice when it comes to deciding on the proper housing needs.

This last item will be a challenge but certainly a fun one. This is a bottle stop that needs to stand upright, in full view, so that it doesn’t have to be handled. I will construct an armature to hold it upright and fabricate a box which will also function as a display stand.

With projects like this, where functionality and use play an important role in the treatment decision, it is crucial to have good communication with the people who use the material. Thinking outside the box can often result in innovative and creative solutions, which is an exciting process that builds on communication and positive team work.

Written by Deborah Howe.