Tuesday, June 26, 2012

American Cookery: A Scaleboard Binding

This spring I had the good fortune to participate in a North Bennet Street School workshop in Boston on scaleboard bindings taught by Julia Miller, as well as attend the accompanying lecture, co-sponsored by North Bennet and the New England Chapter of the Guild of Book Workers.

Julia Miller’s book, Books Will Speak Plain: A Handbook for Identifying and Describing Historical Bindings (The Legacy Press, 2010) covered her research on historic bookbindings, including scaleboard. She is currently working on a typology of scaleboard bindings, collecting evidence on its technique and use through her examination of hundreds of these volumes.

Scaleboard is very thin wood, used as boards in the bindings of smaller books particularly in America from about the late 17th to early 19th century. Sometimes these texts were sewn onto supports, and other times the pages were stabbed together. In Julia’s research, the supports were most often tawed skin, with a leather thong or cloth tape also used in some volumes. She found a few occasions where both sewing and stabbing occurred in a single volume, however as this was unusual she believes it to be the result of a repair, rather than original binding work. Notching of the spine (in preparation for sewing) was widely noted in the volumes even when books were stabbed, indicating books were likely prepped for sewing prior to a final decision on the binding method. Covering material pasted over the boards could be paper, or leather, or a combination of the two, in quarter-style for example. Blue or marbled paper was common. In the books examined by Julia, those in the earlier period (1680s through 1740s) were all in full leather, usually sheepskin, though sometimes goatskin.[1]

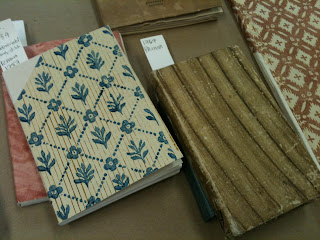
In the workshop we constructed two models: a stabbed quarter leather model (left) and a full leather cover sewn on tawed cords (right).
On each of my models I left half of a board pastedown unattached, to be able to view the construction and materials.

The full leather model was sewn on tawed thongs, which on the front were then brought to the cover and pasted down. The notches are visible here, particularly at the head.

On the back of the full leather model, a piece of paper waste was used as a board liner and the boards were laced in.

On the quarter leather model, the stabbed binding is visible in the joint. The restriction in opening is in relation to where the stabs have been positioned on the sections. The closer the stabs are to the spine folds of the sections, the greater the ease in opening the book.
Besides the construction of models, a hands-on exercise on identification, and an examination of numerous examples of scaleboard bindings, our workshop group also discussed conservation issues surrounding these books. Since there were a number of conservators, helpful suggestions were put forward. In some collections conservators are boxing these books, making very minimal repairs (the consolidation of torn papers or stabilization of broken or weak hinges for example) if any, in order to retain as much of the original binding as possible.

One approach to repairing a loose or broken board, shared by both Julia and by Irina Gorstein, and attributed to Pam Spitzmueller, was to use Ramieband as a support and attachment. Weaving this very thin tape through the stabbed slits and then pasting them onto the interior of the boards can reattach a broken board or strengthen a weak joint. This interested me greatly, as I had a book back at the lab with this problem!

Our volume (pictured from the front).
The title page reads:

AMERICAN COOKERY: OR, THE ART OF DRESSING VIANDS, FISH, POULTRY, AND VEGETABLES. AND THE BEST MODE OF MAKING PUFF PASTES, PIES, TARTS, PUDDINGS, CUSTARDS AND PRESERVES. AND ALL KINDS OF CAKES, FROM TRE IMPERIAL PLUMB TO PLAIN CAKE. Adapted to this country and all grades of life. BY AN AMERICAN ORPHAN, Walpole, NH, Printed for Elijah Brooks, 1812.

(Amelia Simmons is the “American Orphan” according to the cataloging information.)

This small volume’s back board was completely off, as pictured here.
The front board was hanging on by the upper thong only. This book was bound with full marbled paper over scaleboards and two leather thongs attaching the text together. Whether there is any sewing in addition to the stabbed thongs is unclear from my examination. It looks like there is a notch on the spine toward the head of the volume, which may indicate a kettle stitch, but I can’t be sure. I learned that often the texts were notched regardless if these holes were used for sewing.

Gently probing with my tiny Casselli knife, I discovered the stabbed slits were open all the way through the text block and boards. This meant I could weave Ramieband through them to stabilize the covers.

Here is the lower stabbing on the front of the book where I have inserted a piece of Ramieband. The top tape piece will be moved under the board (where there is a break) to the inside of the cover.
After inserting the new tapes, I trimmed and splayed out the ends, attaching them with paste to the inside of the boards. On the front board, I could insert the ends under a loose pastedown. On the back, the pastedown was well secured to the board, so I chose to attach the new tape directly on top of the pastedown. While the repair is visible there, it blends in somewhat, and I didn’t risk causing any new damage.

The interior of the back board after attachment.
Now both boards function as they should, in addition to protecting the textblock. This treatment repaired the board attachment and added strength, while what existed of the original binding remains. The exterior looks just as it did before treatment, except the boards are now secured.

It’s very satisfying to put into practice a new technique immediately after being introduced to it. I suspect more scaleboard bindings will some day make their way through the conservation lab here, due to the history of the binding and the makeup of our collections. When they do, we’ll be ready!

[1] This section is based on workshop notes and an e-mail from Julia Miller in May of 2012. I am grateful for her work on scaleboard bindings, and thank her for sharing that research and clarifying my understanding.

Written by Stephanie Wolff.

Tuesday, June 19, 2012

Planning and Building a Digital Collections Program, May 10, 2012

I recently had the pleasure of working with a colleague from Amherst College to organize a regional forum on "Planning and Building a Digital Collections Program". Kelcy Shepherd and I organized this event through the NorthEast Regional Computing Program, better known as NERCOMP. Our goal was to bring together speakers on a variety of topics related to creating digital collections in a library or archive setting. The forum included four presenters:
  • Dartmouth College Library's own David Seaman, Associate Librarian for Information Management, who spoke about our Digital Library Program Plan and the process we’ve gone through to develop our digital collections infrastructure over the past several years.
  • David Mathews, Partner at The Image Collective, who gave a detailed presentation on the important technical considerations for digital imaging.
  • Nancy McGovern, Head of Curation and Preservation Services at MIT Libraries, who covered the basic components of digital preservation planning. This talk was a very abbreviated version of the ICPSR's five-day Digital Preservation Management Workshop, which builds on the Digital Preservation Management Tutorial found here.
  • Anne Sauer, Director and University Archivist at Tufts University, who talked about the challenges and strategies involved in advocating for digital collections funding within a larger campus environment.
All of the presentations were excellent, and Kelcy and I had a great time organizing the event. The presenters' slides can be found here (some slides are not yet available, but will be soon). Many thanks to all the presenters and participants, and to NERCOMP for hosting the forum!

Written by Helen Bailey.

Tuesday, June 12, 2012

Book Arts Prize Winners for 2012

The Book Arts Prize is a juried award given every year in recognition of excellence in the creation of a hand printed and bound book made in the Book Arts Studio by a Dartmouth College undergraduate.

This year the grand prize award of $500 was given to Taylor R. Campbell, '11 for his entry of "Resigned".
Resigned
The colorfully bound, printed, and illustrated book contains dialogue between Number Six and Number Two from the 1967 British television show, The Prisoner. The judges considered the entry an impressive use of polymer plate printing with traditional letterpress.
Resigned

Honorable Mention for the Book Arts Prize and recipient of a $75 award was Hye (Amy) Gu, '12. Ms. Gu’s poetry book, "Tagore", features the use of letterpress and blind stamping.

The award for Best Hand Bound Book went to Bridget A. Herrera, GR, for "Taino Myths".
Taino Myths
The book of broadsides illustrating authentic petroglyphs and pictographs of the Hispaniola people is a drum leaf binding that opens to each image and allows the viewer to be enveloped by the world the images creates. Ms. Herrera will receive a prize of $150.
Taino Myths

This year because of a number of high quality letterpress entries created with different processes the judges decided to recognize traditional letterpress printing and alternative printing techniques. Sarah Parkinson, '09, won for best Traditional Letterpress Printing with her entry of "Words in Orbit".
"Words in Orbit"

The best example of Alternative Letterpress Printing went to Bridget A. Herrera, GR, for "Deus Est Machina". Each winner will receive $150.
"Deus Est Machina"

Honorable Mention prizes of $75 went to Sarah Parkinson in the Alternative Letterpress category and to Do-Hee Kim, '12, for Traditional Letterpress.

All the winning entries are on display in the Treasure Room cases in Baker Library beginning Saturday, June 9 through the Fall 2012 term.

Congratulations to all the contestants and special thanks to the Friends of the Library for their support of this competition.

Written by Barb Sagraves.

Tuesday, June 5, 2012

Paper and Book Intensive at Ox-Bow, May 13-24, 2012

I was very fortunate to attend the Paper and Book Intensive this year, held at the Art Insitute of Chicago’s summer campus in Saugatuck, MI. Each time I attend PBI the experience gets better and better and this year was no exception. Among all the wonderful instructors, I took classes from Steve Pittelkow, Betsy Eldridge and Maria Fredericks. Below are some of my highlights from each class.

Marbling with Steve Pittelkow

Steve's direct instruction style ensured that each student left with the knowledge of how to create some of the many basic marbled patterns found in historical papers. With a song in his heart, he led us through the various steps in creating simple to advanced patterns. We were also able to experiment with our own designs and fancies.

The aim for color distribution is random symmetry.
The more colors, the more intricate the pattern can be.
After using a stylus to create a pattern, Steve lays down a sheet of alum-sized paper.
This advanced technique is quite beautiful and gives a 3-D effect, called Spanish Moire.

Photo Albums with Betsy Eldridge

In this class I was able to construct a sampler of various ways to mount photos and other heavier material. Betsy graciously pre-cut much of the material so we were able to focus on the construction of our pages.

For our final project we constructed a very complex album that incorporates an intricate arrangement of cloth hinges. It opens beautifully and very flat.

Interspersed with our tasks at hand, Betsy gave us many tips and tricks. Here is a trick to burnish and soften paper: take some beads and roll them around in a circle moving over the surface of your paper. You’ll notice a dramatic difference afterward.

These are all of our completed photo albums displayed during show and tell.

Paper Cases with Maria Fredericks

What I enjoyed so much in this class was the opportunity to explore and consider the function of the paper case in the context of history, and its diminishing quality over time. Looking at models representing the 15th to 17th centuries, it was clear how the sewing became abrreviated with the pressure to bind more in less time.

Many of the paper bindings have lovely decorated covers. Often these printed covers are produced on thinner paper and then become a covering to the primary case. We made our own decorated papers using acrylic and blocks cut from a soft rubber.

Firmly placing the block into the color.
Printing the colored design onto our paper.
A second color can be hand painted in to add to the decoration.
A tip I learned: When folding over a shorter edge, place that edge under the larger portion when making your final hard crease. This helps the shorter edge stay put.

Maria demonstrates the steps to creating the case.
Lacing in the text block.
If a decorated paper is used, it is put on before the foredge turn-ins are completed.
Here are some of our completed books.
PBI is a wonderful and invigorating experience. It brings together teachers, artists, conservators, paper makers, printers and more to exchange and share experiences and knowledge so that at the end everyone goes away with so much more than they came with, including new friends to connect to.

Written by Deborah Howe.